Reading and Writing Visio Shape Information with C#
Often, you want to either to read or put some additional information regarding shapes in your diagram. For instance, you have an application for drawing a layout of your office. Obviously, every piece of equipment or furniture your have has some information, such as its name, code and any other information related to facility management. There are two ways of reading/writing such kind of information. The first one is to make use of Visio custom properties, while the second one is to store that kind of information in a database. The former is relatively simple, as it doesn’t require to have any additional layer, such as database. At the same time, the latter is more versatile, as it allows integrating Visio application with other business application by querying a database. In the tutorial we cover the first option, that is using custom properties of Visio.
When drawing diagrams in Visio you often can assign custom properties to shapes by right-clicking and choosing Properties. For instance, during a creation of an Office Layout diagram you can see the following dialog.
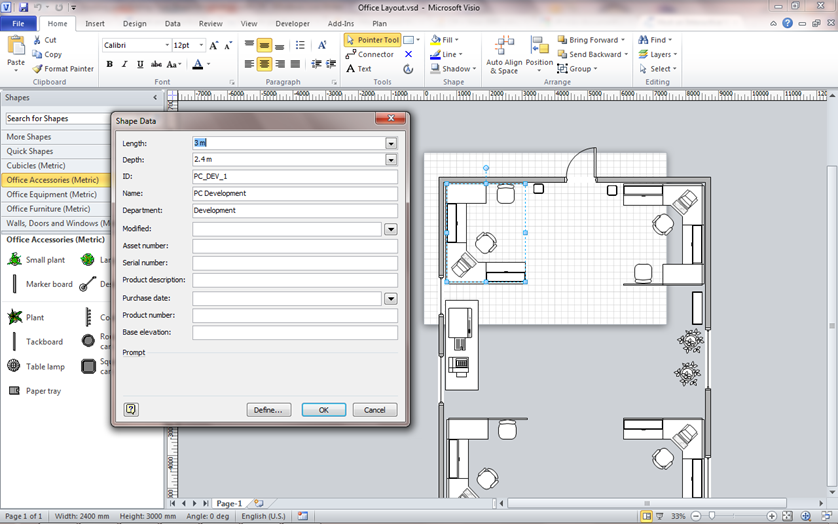
The dialog prompts to enter such information as length, depth, ID, name, product number and any other information that makes sense for furniture and office equipment.
For sure, the Visio API provides tools for reading and writing such pieces of information. In the previous tutorial I briefly mentioned that every Shape object holds a property of the type of Cell that keeps shape’s properties, as well as additional properties. In order to access one of them you should refer to Shape.Cell['PropertyName'].
Usually, property names slightly differ from those ones displayed in the user-friendly Visio dialog. It doesn’t impose a serious problem, however, because their names can be looked up in the ShapeSheet Data Window. The window is accessible on right-clicking a shape and choosing Show ShapeSheet. If you can’t see that window, then you must enable the Developer mode, which can be done by going to File->Options->Advanced and ticking Run in developer mode.
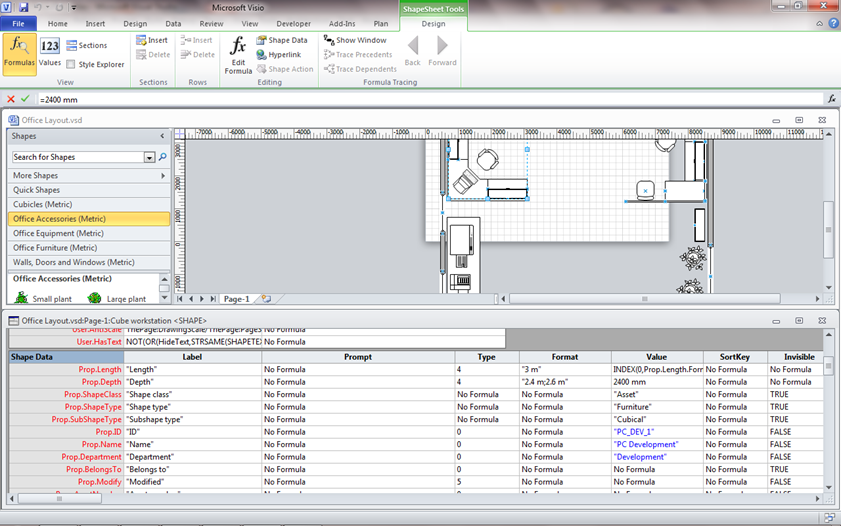
The window shows a whole cell of available properties including some general ones linked to a shape appearance and a position in a diagram to more customised one located in the Shape Data section where you can spot properties like Prop.Department, Prop.Name and so on.
We will create a simple application that will display a few properties in a form on selecting a shape. Modification of those properties will be also preserved. Moreover, we will allow user to save a modified diagram.

The basics of creating applications for Visio are given here, while another tutorial explains how to track if a shape has been selected in a diagram, as well as how to handle some other events.
So, when handling the SelectionChanged event we must extract and display values of custom properties we are interested in.
private void visioControl_SelectionChanged(object sender, EVisOcx_SelectionChangedEvent e)
{
    Visio.Shape selectedShape = this.visioControl.Window.Selection.PrimaryItem;

    //we bind only if we have selected a shape, not in case if we have deselected it
    if (selectedShape != null)
    {
        Binding bindingId = new Binding("Formula");
        bindingId.Source = selectedShape.Cells["Prop.ID"];
        //we update a source, in our case, a Prop.ID everytime we type in something in a textbox
        bindingId.UpdateSourceTrigger = UpdateSourceTrigger.PropertyChanged;
        //we specify a converter that removes trailing and leading quotes when displaying values
        //and enquotes values when saving them
        bindingId.Converter = new VisioCellFormulaConverter();
        tbId.SetBinding(TextBox.TextProperty, bindingId);

        Binding bindingName = new Binding("Formula");
        bindingName.Source = selectedShape.Cells["Prop.Name"];
        bindingName.UpdateSourceTrigger = UpdateSourceTrigger.PropertyChanged;
        bindingName.Converter = new VisioCellFormulaConverter();
        tbName.SetBinding(TextBox.TextProperty, bindingName);

        Binding bindingDepartment = new Binding("Formula");
        bindingDepartment.Source = selectedShape.Cells["Prop.Department"];
        bindingDepartment.UpdateSourceTrigger = UpdateSourceTrigger.PropertyChanged;
        bindingDepartment.Converter = new VisioCellFormulaConverter();
        tbDepartment.SetBinding(TextBox.TextProperty, bindingDepartment);
    }
}
Okay, it is clear that we have a WPF application because of having bindings. However, they do not make things any more complicated. Basically, we refer to a selected shape by pointing to Window.Selection.PrimaryItem. Well, in case there are multiple items in a selection we display information only on the first one. Then, provided we have three different text boxes for three different properties we specify bindings for those properties (Prop.ID, Prop.Name, and Prop.Department). Each Cell object contains a property, Formula, that has a corresponding value, so we put in as a binding path. Since, that property, Formula, is surrounded by quotes, we remove them when showing data and put them back by using a converter called VisioCellFormulaConverter.
public class VisioCellFormulaConverter : IValueConverter
{
    public object Convert(object value, Type targetType, object parameter, System.Globalization.CultureInfo culture)
    {
        string result;

        if (!string.IsNullOrEmpty(value.ToString()))
        {
            string sValue = value.ToString();

            result = sValue.Substring(1, sValue.Length - 2);
        }
        else
        {
            result = string.Empty;
        }

        return result;
    }

    public object ConvertBack(object value, Type targetType, object parameter, System.Globalization.CultureInfo culture)
    {
        return "\"" + value.ToString() + "\"";
    }
}
You can find the rest of the source code, as well, as the sample diagram here.
The opinions expressed herein are my own personal opinions and do not represent my employer's view in any way. My personal thoughts tend to change, hence the articles in this blog might not provide an accurate reflection of my present standpoint.
© Mike Borozdin